
The Backbone of Your Institute Paper
In college and institute paper formatting, the Table of Contents (TOC) is more than just a list—it's the map of your research. A common nightmare for students is manually typing out chapters and page numbers, only to have everything shift when they add a single paragraph.
PaperFormat.net eliminates this entirely. Our system scans your document for Headings (H1, H2, H3) and builds a live, dynamic TOC that updates instantly. You never have to type a page number manually again.
Method 1: The One-Click Automatic Generation
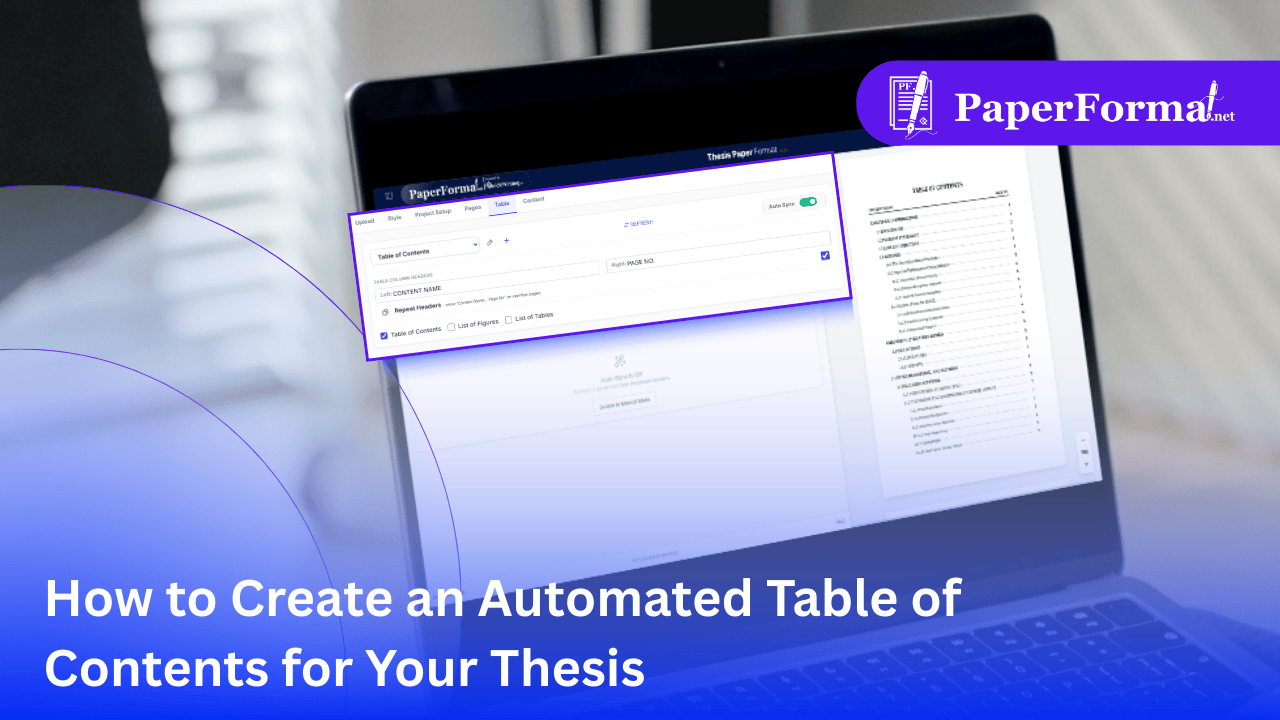
Refer to the screenshot above and follow these steps for the fastest setup.
Step 1: Access the Table Module
- Navigate to the "Table" tab in the top navigation bar.
- This dedicated workspace manages all your indices (TOC, List of Figures, List of Tables).
Step 2: Enable Auto-Sync
- Look at the top right corner. Ensure the "Auto Sync" toggle is turned ON (Green).
- What this does: It tells the system to constantly watch your document. If you change "Chapter 2" to "Chapter II", the TOC updates automatically.
Step 3: Select Your Lists
- Check the box for "Table of Contents".
- You can also check "List of Figures" and "List of Tables" here if your thesis formatting requires them.
Step 4: Customize Headers
- Column Headers: You can rename the columns. The image shows "Left: CONTENT NAME" and "Right: PAGE NO.".
- Repeat Headers: Check the box "Repeat Headers". This is crucial for long TOCs that span multiple pages—it ensures the "Content Name / Page No." header appears on the second page too.
Step 5: Generate
- Click the "REFRESH" button.
- Result: As seen in the preview on the right, the system generates a perfectly structured list with dotted leaders and accurate page numbers.
Method 2: Manual Control for Custom Requirements
Sometimes, institute paper formatting requires you to tweak a specific title without changing the actual chapter name.
Step 1: Switch to Manual Mode
- Turn the "Auto Sync" toggle OFF.
- A new set of controls will appear.
Step 2: Import and Edit
- Click "Import current auto-generated list". This pulls your current headings into an editable list.
- Edit Items: You can now click on any item (like "1.1 BACKGROUND") and rename it, or change its hierarchy level (e.g., change Level 2 to Level 1) without affecting the actual text in your document chapters.
- Reorder: You can drag and drop items to change their order in the TOC manually.
Why Automation is Essential
- Zero Math: You don't need to calculate page numbers. The system knows exactly where "Chapter 3" starts.
- Clickable PDF: The generated TOC acts as a hyperlink map. In the final PDF, clicking a chapter title jumps the reader directly to that page.
- Visual Hierarchy: The system automatically applies the indentation rules you set in the Style tab, ensuring a professional "step-down" look for sub-chapters.